
After you export a sprinkler system from AutoCAD with HASSCAD, you bring the export into HASS Cloud. You can create a new calculation file from the export or add the export to a calculation file you already have. Either way, you review the system on the CAD Import screen before HASS Cloud saves anything.
Before you start, export the system with the 2D Export tool. See Using HASSCAD in AutoCAD. Importing requires an editor license. Viewers can open the CAD Import screen in the examples.
Start an import
Create a new calculation file
On the HASS Cloud home page, Import File(s) opens the Import Design Files dialog. An AutoCAD export will have the .hcai file extension. Selecting continue after choosing your AutoCAD export opens the New Calculation File from CAD import dialog.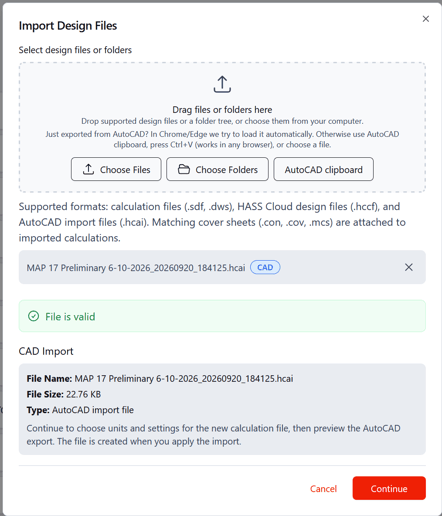
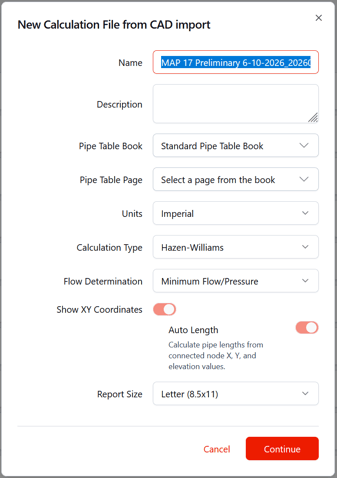
In the New Calculation File from CAD import dialog:
- Name defaults to the export's file name.
- Check the Pipe Table Book, Pipe Table Page, Units, Calculation Type, Flow Determination, and Report Size.
- Show XY Coordinates and Auto Length stay on for CAD imports. Show XY Coordinates lets HASS Cloud show a network view of the system. Auto Length calculates pipe lengths from the node coordinates and elevations.
Add to an existing calculation file
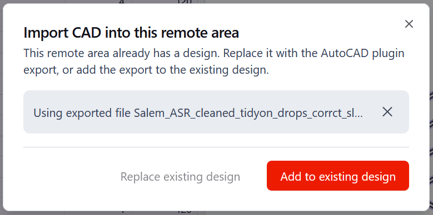
In a calculation file, Import CAD in the hamburger menu opens the Import CAD into this remote area dialog. The export goes into the current remote area.
- If the remote area is empty, Add to existing design adds the export to the remote area.
- If the remote area already has a design, choose how the export comes in:
- Add to existing design keeps the current design and adds the imported geometry. The imported geometry isn't joined to the existing design.
- Replace existing design removes the remote area's current nodes, pipes, and sources, then imports the CAD geometry. Replace isn't available when the remote area has shared elements.
Load the export
Both dialogs load the export the same way:
- If you used Export to Clipboard, Chrome and Edge usually load the export automatically. In any browser, you can also select AutoCAD clipboard or press Ctrl+V.
- If you used Export to File, select Choose Files, or Choose file in the Import CAD dialog, and then select the .hcai file.
Confirm drawing units
The drawing length unit scales the cordinates of objects read into HASSCloud. The drawing length unit doesn't change the calculation file's units. This scale may also be changed via the Drawing Length Units in the import preview import options.
The CAD Import screen
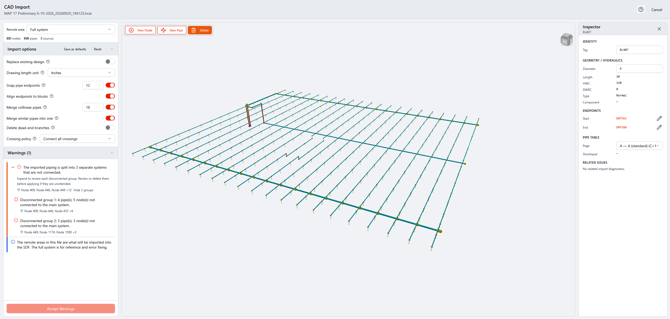
The CAD Import screen builds a preview of the system from the export. Nothing is saved to the calculation file until you import. Cancel discards the import.
The screen has three areas:
- Sidebar: the Remote area dropdown, the node, pipe, and source counts, Import options, Warnings, and the Import button.
- Preview: the system itself, with the New Node, New Pipe, and Delete tools.
- Inspector: opens when you select pipes or nodes in the 3D viewer.
The first time you open CAD Import, the CAD Import help opens. To open the help again, select the CAD Import help button next to Cancel.
Navigate the preview
- Scroll to zoom. Middle-drag to pan. Right-drag to orbit.
- Select a pipe or node to inspect the object. Shift+click adds to the selection.
- Drag from left to right to select objects fully inside the box. Drag from right to left to select objects the box touches. Shift+drag adds to the selection.
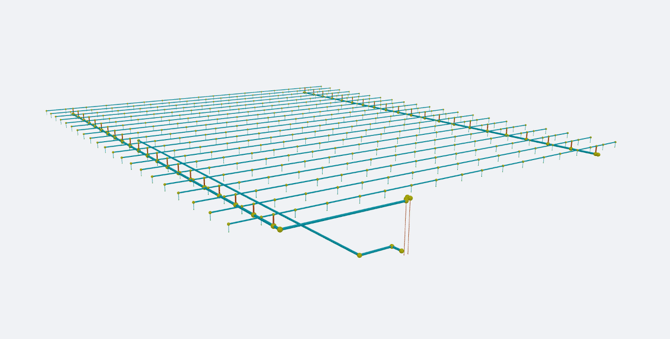
Remote area dropdown
When the export includes remote areas, the Remote area dropdown switches the preview between Full system and each remote area. HASS Cloud imports only the remote areas if present, the Full system view is for reference and for fixing errors. For more on remote areas, see Remote areas.

Import options
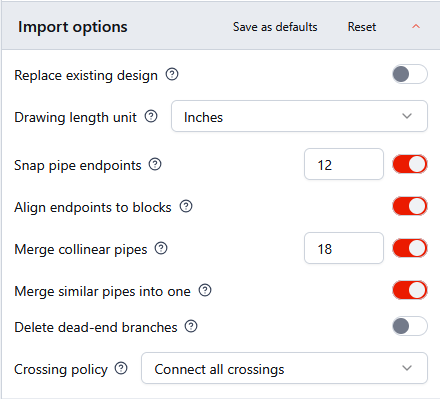
Import options control how HASS Cloud cleans up the geometry from AutoCAD. Change them only if the preview looks wrong. The preview rebuilds when you change an option. Distances use the drawing length unit.
- Drawing length unit: The unit the plan was drawn in. The value comes from the export. If the plan looks the wrong size, change the Drawing length unit. Changing the unit scales the plan but doesn't change the calculation file's units.
- Snap pipe endpoints: On by default. Joins pipe ends within the Snap distance of each other.
- Align endpoints to blocks: On by default. Moves pipe ends marked by AutoCAD as visually within the object onto the sprinkler, source, or node blocks.
- Merge collinear pipes: On by default. Joins nearly straight pipe pieces when the gap is within the Max merge gap.
- Merge similar pipes into one: On by default. Turns connected straight pipes of the same diameter into one longer pipe.
- Delete dead-end branches: Off by default. Removes pipe branches that don't feed a sprinkler, source, or riser.
- Crossing policy: How HASS Cloud connects pipes that cross.
- Connect all crossings, the default, joins every crossing into a shared node.
- Connect only when a node marks the crossing connects a crossing only if a node is already there.
- Do not connect leaves crossings disconnected.
- Replace existing design: Appears when you import into a remote area that already has a design.
Save as defaults keeps the current options for later imports. Reset returns the options to the standard defaults.
Warnings
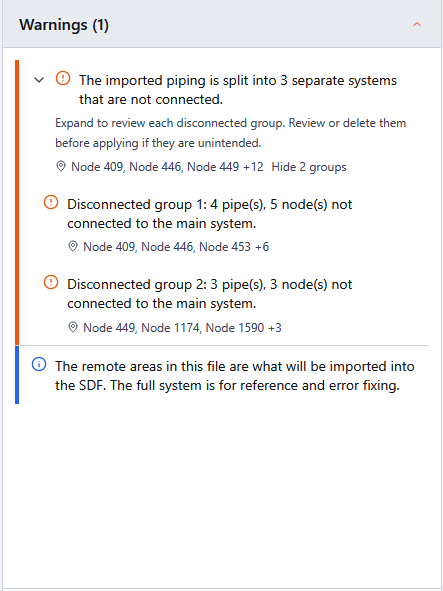
Warnings lists problems HASS Cloud found in the import, with a count. Select a warning to highlight the problem in the preview.
Common warnings include:
- Disconnected groups: The piping is split into separate systems, and the preview colors each connected system. Connect the groups with New Pipe, or remove an unintended group with Delete disconnected.
- Open the dropdown on the separate systems warning to see each individual disconnected system.
- Pipe crossings that need review.
- Unconnected sprinklers or a missing source: Sprinklers that aren't connected to any pipe, or no source in the import.
- Pipe slope conflicts: A pipe slope doesn't match the elevations at the pipe's ends.
- Pipe ends moved too far: Snap pipe endpoints and Align endpoints to blocks moved pipe ends far from the drawing. Decrease the snap distance, or turn one of those options off.
Some warnings block the import. When a riser or drop landing needs an elevation, the Import button reads Resolve blocking issues. Select the warning, enter the Elevation in the Resolve panel, and then select Apply elevation. When a vertical pipe needs a target elevation, enter the elevation in Target elevation in the Inspector.
If an import is too large to save as a calculation, the preview stops with an Import stopped message. Try a smaller area, a single floor, or a crossing policy that connects only at nodes.
Inspector
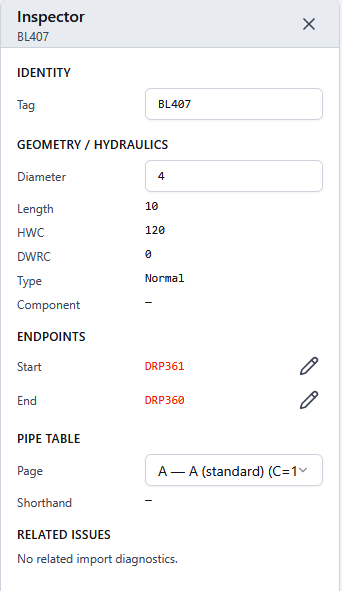
Select one or more pipes or nodes to open the Inspector. You can edit values in the Inspector before you import.
- Pipes: You can edit the Tag, Diameter, Start and End nodes, and pipe table Page. For a sloped pipe, Flip slope reverses the slope direction. Length comes from the node coordinates.
- Nodes: You can edit Elevation, K-factor, Density, and Area.
- Several objects: When the selected objects have different values, the field shows varies. Editing the field updates every selected object.
- Related issues: Lists the warnings that involve the selected object.
- Units: A number without units uses the calculation file's units. Type units with the number to override them, for example 2.5 in or 65 mm.
New nodes and pipes
Use the tools on the preview to fix geometry before you import:
- New Node: Adds a node at the X, Y, and Z coordinates you enter. Coordinates use the calculation file's units, and Z is the elevation.
- New Pipe: Connects two nodes. Select two nodes first, or select New Pipe and then pick the start node and the end node. Press Esc to cancel.
- Delete: Removes the selected pipes and nodes from the preview. You can also press Delete or Backspace.

The Import button changes with the state of the import:
- Import: No warnings remain.
- Accept Warnings: Warnings remain. The Accept Warnings dialog lists the warnings, and Accept and import imports the system with the warnings.
- Resolve blocking issues: A blocking warning needs to be fixed first.
HASS Cloud saves the geometry into the calculation file and opens the file. You can keep editing properties in the calculation file after the import.
Related articles: Using HASSCAD in AutoCAD· Installing HASSCAD for AutoCad · Exporting and Importing Multiple Remote Areas from AutoCAD